Make a robot with Rust 🦀 and avr-hal 📦
2 years ago
As a newly converted Rustacean, I wanted to port one of my favorite projects to explore the language. The project is an obstacle avoiding robot. Very easy in Arduino and it allows to get a better feel for the Rust language.
But let me tell you a little horror story.
Back in the days, when I was a happy-go-lucky, hopeful computer science first year student™ (so two years ago), I did a fatal mistake during an oral exam. We had one job : explain the timer/interrupt code we just wrote. In an if statement, I wrote an assignment = instead of an expression ==. You realise the drama. After the initial chock and tears and hours long debugging, and a miraculously validated exam, you can understant that I joined promised land of 🦀 guaranteed safety. What C let me do, Rust would never allow.
Before we get started 👩🏿💻!
- Try to remember frequency and period from high school. A fuzzy memory is good enough.
- I don’t know embedded so I am open to any feedback where you see something inaccurate.
- This article and this car would DEFINITELY not have been possible without the help of Rahix, who created avr-hal, and the Rust Embedded working group. Lots of Love to them 💌. Also, Rust forum is home to many amazing people who will also help you.
Using AVR-hal 📦
Arduino runs on AVR microcontrollers. Those can be addressed by register as any MCU. Luckily, the avr-hal project has you covered for most of the popular MCUs.

Look up for your board name, and go run one of the 😉💡-blinkin led super easy examples to get a feel for it. As easy as Arduino, but in Rust. How cool is that?
Using avrdude
To flash on your MCU, you will need to install avr-gcc to use avrdude 👨🏽🔧 (who is not somebody on twitter but the DownloaderUploader, aka the program who will communicate with your MCU..
Check if you have the command line developer tools with :
xcode-select --install
Run and install the lattest version of avr-gcc :
brew tap osx-cross/avr``brew install avr-gcc
You can now brew avrdude, with brew install avrdude.
You will also need Rust nightly as most embedded projects are done in that mode.
Get in the car!
I listed all the hardware you will need in my repository, but really, any generic sensors (distance), servo and motors will do.
You can communicate with your board via avrdude with a script (also details also in the repo:). I also commented the hell out of my code - and if you have questions, just reach out! What I don’t know, we will figure out together. Worry not, by “we” I mean mostly the Rust Embedded working group on their matrix.
Let me go over the important parts in the different modules.
main.rs
This is a Rust nightly, no-std Rust project, which means it will not use the standard library. You need to indicate to your program the entry point.#[arduino_uno::entry]
Then with avr-hal, you will acquire the content of your MCU:
let dp = arduino_uno::Peripherals::take().unwrap();
… and collapse the ports:
let mut pins = arduino_uno::Pins::new(dp.PORTB, dp.PORTC, dp.PORTD);
The serial is needed only for testing your vehicle on your overloaded table.
You will need two timers. The first one will be used for every waiting time and setting the ultrasonic sensor high for 10 μs. The timer needs to be prescaled because the internal clock is 16Mhz. You probably remember from middle school that:
that is 4 ms before the timer overflows. That is pretty useless. By prescaling frequency you allow more manageable cycles:
It means that after 260 ms the timer will overflow and restart from zero. To read the timer, we just need to read the number of counts it is at. For example, to get 100ms, which is a good time to send a new echo wave, we do . So when we are at 25000 counts we know that 100 ms have passed.
let timer1 = dp.TC1;
timer1.tccr1b.write(|w| w.cs1().prescale_64());
Timer2 is initialized as well in the main (more in servo part!)
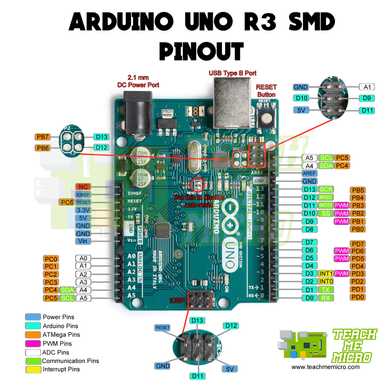
As per the docs, timers are hardwired to some pins. This means that to rotate a servo motor, you need to be careful with declaring the corresponding pin.
Next, assign the pins you will use for your wheels. The pins can be downgraded to allow the wheels to be used in an array.
Important ❗
- to get the type of a variable in Rust, you can always type a line with an incorrect type,
let x :() = wheels, and the compiler will refuse to compile and provide you the right type
--> src/main.rs:106:15
   |
106 |     let x:()= wheels;
   |           --  ^^^^^^ expected `()`, found array of 4 elements
   |           |
   |           expected due to this
   |
   = note: expected unit type `()`
                  found array `[arduino_uno::atmega328p_hal::port::Pin<arduino_uno::atmega328p_hal::port::mode::Output>; 4]`
- at this point of time, the compiler will give this information. Please note that this is not arduinouno::atmega328p\_hal but arduino_uno::hal
motors.rs
In that module, (that we need to import to the main), we are using the wheels array &mut [arduino_uno::hal::port::Pin<arduino_uno::hal::port::mode::Output>; 4] and destructuring the wheels.
pub fn go_forward<>(wheels: &mut [arduino_uno::hal::port::Pin<arduino_uno::hal::port::mode::Output>; 4]) {
    // Be careful here with the order of unpacking. In my case, pin 4 is connected to left forward, 5 to left backwards, etc
    let [left_forw, left_back, right_forw, right_back] = wheels;
You might need to adjust the constants for to get the right lengths (how long your car is going to turn right or left) for your project (and the state of your batteries!) A lot can happen with tired batteries and frictionous floors. Or not.
servo

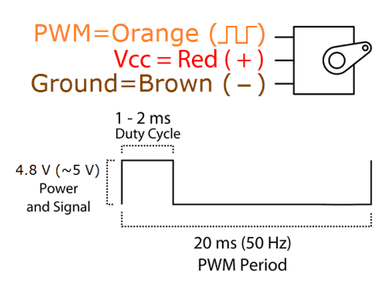
Here, we are simply assigning duty cycles according to the data sheet for SG90 sensor.
Timer2, which is going to be used for the servo motor (the little rotating head), needs to be prescaled even more than by factor 64.
Why? Most servo motors need a frequency of 50Hz and short duty cycles to rotate. Duty cycles are nothing mystical, it is the percentage of power you give to your motor, to control its rotation.

Please note, that while timer1 is a 16bit sensor, timer2 is a 8 bit sensor! That means that for our calculation, and according to the datasheet for the servo:
So, 16 ms, 60 hz approximately.
// in main module
let mut timer2 = pwm::Timer2Pwm::new(dp.TC2, pwm::Prescaler::Prescale1024);
let mut pd3 = pins.d3.into_output(&mut pins.ddr).into_pwm(&mut timer2);
When rotating the motor, we are not reading but writing to a special register OCR (output compare register). But avr-hal protects us from all this low-level scariness, and you just write the number of counts you need to rotate your servo. The duty cycle that those servos need are between 1 and 2ms. To center the servo for example, you need:
sensor

For the sensor, I made a sensor unit struct that is filled in main. Here this is only a question of setting the trigger high, and low again. We start it by writing to the timer counter register (tcnt1) to start it:
sensor_unit.timer.tcnt1.write(|w| unsafe { w.bits(0) });
We then set it high for 10 us.
sensor_unit.trig.set_high().void_unwrap();
delay.delay_us(TRIGGER_UP_TIME);
sensor_unit.trig.set_low().void_unwrap();
We make a sanity check to continue if the sensor does not detect anything:
'outer: while sensor_unit.echo.is_low().void_unwrap() {
// if more than 200 ms ( = 50000) we might have not detected anything and can continue.
if sensor_unit.timer.tcnt1.read().bits() >= 65000 {
      continue 'outer;
   }
}
and last, we measure the echo by waiting for it to go low again.
while sensor_unit.echo.is_high().void_unwrap() {}
That’s it. I would recommend to pay special attention to avr-hal instructions for starting your project. To make sure your whole system is grounded as per the schematics. For the rest, good luck and you can always come and find us if you need anything!